Saturday, July 25, 2015

Just Like the Movies, Google Wants You to Capture Live Videos With Google Glass

google-glass-sergey-brin
Missing all those memories you made with your friends in the school, or college? Well, how well do you remember them? Do you remember the happy faces of the people who came to your birthday last week? You might have seen in sci-fi movies, how humans from the future do everything with just a click, all happening inside their brain, or some tiny gadget. Working on the same line, Google is preparing to inculcate a real-life incident capturing tech in the next version of Google Glass.
Google has recently been awarded a new patent that will replace your tangible memory and make it a searchable video library. Yes, your life experiences stored in the cloud. This patent, if paired with a wearable like Google Glass, could make our fantasy of living everything once again, a possibility.
With this patent, Google wants to mount a tiny camera over Google Glass. This will make a video archive by sending it to your private phone. Now, your phone will upload the video to the server, that will be used later. The idea is to empower you to search memories from a “search engine of memories”, just like the usual Google search.
These video memories will be tagged with location and time. Quartz writes about the intuitive advantage Google intends to provide with this feature: as soon as your search engine of memories detects some pre-set recording location, it will automatically start recording the memories.
This futuristic Google Glass will also be having the ability to talk to you and listen your commands. You’ll curse your fragile memory and then thank this intelligent search engine of memories for answering life-saving questions like, “What was the name of place where I went on the first date with my girlfriend?” and “What did we eat that evening?”
Currently, this is a patent and we can’t say anything with certainty that Google will convert it into a memory capturing Google Glass. Quartz writes that it could also be embedded in other products like Google Photos to make your life easier and fun.

Thursday, July 2, 2015

TOP 10 BEST SCREEN RECORDING SOFTWARE FOR WINDOWS

Icecream Screen Recorder, which comes from Icecream Apps, is a completely free tool to record and capture screen. With wide support for Windows OS, ranging from Windows 2000 to Windows 8, Icecream Screen Recorder is a good solution for every Windows-based PC user. If area selection feature of Icecream Screen Recorder lets you have your focus on, what you want, drawing panel will help you add ‘creative’ touch to the screenshot or recording. In addition to these, hotkey support, audio settings, screenshot to URL, clipboard feature, project history are notable features of Icecream Screen Recorder.
2. ActivePresenter (Free)
If you’re planning something huge with screen recording, say educating or tutorials, ActivePresenter will be a superb companion for you. Coming from Atomi Systems, ActivePresenter focuses on making screenshots and recordings bit more interactive that they will be useful while explaining. For instance, to make things easily explainable, this tool is offering a feature to insert interactive elements like callouts, voiceover, annotations, graphics etc. At the same time, its support for SCORM-complaint Learning Management Systems suits its role as a corporate training tool as well. In addition to free version, professional and standard editions are available.
3. CamStudio (Free)
CamStudio is a widely used tool for screen recording and capturing and has broken a number of records when we do take the case of downloads. Despite the fact that CamStudio does not offer many features, its features are, indeed, a bunch of noticeable ones. For instance, while using CamStudio to capture and record your PC screen, you’ll be able to hide your curser screen, get sound from multiple sources, etc.
4. Snagit (Premium)
Snagit, yet another amazing product from TechSmith, has been helping a number of professionals and individuals to capture and record their PC screen for multiple purposes. Although there is a free trial, Snagit is actually a paid tool, to buy which you have to spend big. Powerful editing tools, free tech support, integration with cloud-based services, ability to set hotkeys, etc are what make Snagit a top tool when it comes to screen recording. However, after all, it is paid software, though it is worth what you pay.
5. EZVID (Free)
Are you looking for a screen-recording tool that can be used to record videos and instantly upload them to YouTube? If so, EZVID can be your perfect choice. Best part of EZVID is that you do not have to find an external video editor; it’s so because EZVID comes with an integrated video editor. Resembling the case of most tools in the list, EZVID is also a free tool to use. Speed control, speech synthesis etc are also noticeable features of this tool. It supports Windows XP to Windows 8.
6. Jing (Free)
TechSmith knows that there are some, who cannot afford Snagit. That may be why TechSmith has made Jing, a small yet effective tool for screen capturing tool, available free. Jing does not come with high quality, feature-rich and productive editor and other stuff, but it lets you plan, record and share videos in a matter of seconds. Though being free, you can grab free tech support feature from TechSmith. However, we would like to add that Jing will not be a sufficient choice if you are planning to do some BIG screen recording and capturing works. Nevertheless, just like you do in Snagit, you can set up hotkeys and make things quicker.
7. Webinaria (Free & Open Source)
If you are an open-source lover and to find an open-source product for screen recording and capturing, Webinaria is your optimum answer. Using this Windows-based application, you will be able to create Flash videos of PC recording as well as add your own voice commentary using record feature. Although not much big in amount, Webinaria offers some sorts of editing features like insertion of text. Also, it can let you set certain hotkeys. After all, Webinaria is an open source product, and be proud to use it.
8. Camtasia Studio (Premium)
Well, Camtasia studio is the third product from TechSmith in this list and the second premium product. Aim of this tool is to simplify screen recording and video editing possible for everyone, and we should say it has succeeded to do so, that too in a smaller time. Since Camtasia is a really powerful tool, you will not find any difficulty in recording the screen of your Windows (a Mac version is also available, by the way). Some of new features such as cross-platform screen recording, integration with Google Drive and TechSmith Fuse are really impressive, indeed.
Rylstim Screen Recorder is a simple-enough tool to record what is happening in your PC screen. Once you have done with installation of this recorder, you have to select codec, frame rate and location where you would like to store the file and just hit ‘Start Recording’. Rylstim Screen Recorder will give you the result video once you have finished this recording process — simple as that. And, of course, Rylstim Screen Recorder is absolutely free and you can even get a portable version.
10. Screenr (Free)
Here comes the tenth one and we will have a twist! Unlike abovementioned tools, Screenr has nothing to do with PC or installation, but it works solely based on your web browser. The only thing you have to make sure is that Java has been installed in your PC. Thus, when you want to record, let it be any device, go to Screenr.com and start recording.

Tuesday, June 30, 2015

COOL WINDOWS 7 SHORTCUTS

Anyone working professionally with a computer has their hands on the keyboard most of the time. Reaching for the mouse can be an annoying disturbance and personally I often turn over my mouse in such situations. An easy solution is to simply keep the hands on the keyboard and complete as many tasks as possible with keyboard shortcuts only.
Apart from making you work more efficiently and faster, you can also impress your friends or colleagues by being able to work without a mouse. This article describes some cool Windows 7 keyboard tricks to get you started. In the end you might never want to take your hands off the keyboard again.

For your convenience, more keyboard shortcut resources are attached at the bottom.
Note that some of these shortcuts will only work if Windows Aero is enabled. If Aero effects are disabled on your computer, it might not be powerful enough to support resource intensive graphical features. The visual effects may also have been disabled to increase overall performance. If you wish to enable Aero nevertheless, have a look at my recent article explaining How To Enable and Troubleshoot Aero Effects in Windows 7.

Aero Shortcuts

  • [Windows] + [Spacebar] (Aero Peek)
    Make all open windows transparent to view gadgets and icons on desktop.
cool keyboard tricks
  • [Windows] + [D] (Aero Peek)
    Show or hide the desktop.
  • [Windows] + [Home] (Aero Shake)
    Minimize all but selected window. Reverse by clicking the key combination again.
  • [Windows] + left arrow OR [Windows] + right arrow (Aero Snap)
    Dock selected window to the left or right half of your screen.
  • [Windows] + up arrow OR [Windows] + down arrow (Aero Snap)
    Maximized and restores the selected window.
  • [Windows] + [SHIFT] + up arrow OR [Windows] + [SHIFT] + down arrow (Aero Snap)
    Maximizes and restores selected window in vertical dimension only.
  • [Windows] + [Tab] (Aero Flip)
    Launch 3D representation of open windows and click [Tab] key again to flip through them.

Windows & Taskbar

  • [Alt] + [Ctrl] + [Tag] + left/right/up/down arrow
    Flip window.
  • [Alt] + [Tab]
    Cycle through open windows.
windows 7 keyboard tricks
  • [Windows] + [T] OR [Windows] + [SHIFT] + [T]
    Move focus to front or back of taskbar. Press [T] again while holding the [Windows] key to cycle through items in the taskbar from left to right or, with [SHIFT] button held too, from right to left.
  • [Windows] + [B]
    Puts focus on the ‘show hidden icons’ button on the system tray.
  • [Windows] + [1] THROUGH [Windows] + [9]
    Launch first through ninth icon on taskbar, including items pinned to taskbar.
  • [Windows] + [SHIFT] + [1] THROUGH [Windows] + [SHIFT] + [9]
    Starts new instance of respective taskbar icon.
  • [Windows] + [Ctrl] + [1] THROUGH [Windows] + [Ctrl] + [9]
    Cycles through multiple instances of the respective icon.
  • [Windows] + [Alt] + [1] THROUGH [Windows] + [Alt] + [9]
    Opens jump list for respective icon.
fun keyboard tricks

Multiple Monitors

  • [Windows] + [SHIFT] + right arrow OR [Windows] + [SHIFT] + left arrow
    Move selected window from one monitor to another. They will remain in the same relative location.
  • [Windows] + [P]
    Select presentation display mode.
fun keyboard tricks

Magnifier

  • [Windows] + [+] OR [Windows] + [-]
    Activates Windows Magnifier to zoom in or out of screen.
  • [Ctrl] + [Alt] + [D]
    Switch to docked mode.
  • [Ctrl] + [Alt] + [L]
    Switch to lense mode.
fun keyboard tricks windows
  • [Ctrl] + [Alt] + [F]
    Switch from docked or lens mode back to full screen mode.
  • [Ctrl] + [Alt] + [I]
    Invert colors.
  • [Windows] + [Esc]
    Exist magnifier views.

Other

  • [Windows] + [G]
    Cycle through desktop gadgets.
  • [Windows] + [X]
    Launches Windows Mobility Center. Especially useful if you’re working on a laptop.
windows keyboard tricks

COOL WINDOWS 8 SHORTCUT TRICKS


In these key combinations, hold down the Windows key (normally located between Alt and Ctrl) and another key, as described on this list.
  • Press the Windows key to enter the tiled Start screen.
  • The Windows key + M minimizes everything that's showing on the desktop.
  • The Windows key + E opens Explorer for quick access to folders.
  • On the Start screen, press the Windows key + D to instantly get to the desktop.
  • The Windows key + Tab opens a list of currently running programs.
  • The Windows key + Print Screen takes a screenshot and saves it in a Screenshots folder nested in your Pictures folder. 
  • To take a screenshot on a Windows 8 tablet, simultaneously press the Windows button and the volume-down button on the tablet chassis.
  • The Windows key + Q opens a global search menu. Type what you're looking for and where you would like to look.
  • The Windows key + W opens a search in your system settings to quickly locate and change system properties.
  • The Windows key + F opens a file and folder search.
  • The Windows key + Pause opens the system properties page to show you a quick rundown of your specs.
  • The Windows key + "," (that's the comma sign!) makes all current windows transparent, giving you a peek at the desktop as long as you hold down the Windows key.
  • The Windows key + "." (the period) snaps a window to the right or left side (toggling each time you press ".").
  • The Windows key + R prompts the Run command—useful for quickly launching apps and other routines with a command prompt.
  • The Windows key + X opens the Quick Access Menu, exposing system functionality such as the Command Prompt, Disk Management, File Explorer, Run, and more. Alternatively, you can right-click on the bottom right corner of the screen to spawn the Quick Access Menu.
  • The Windows key + I opens the settings menu, giving you quick access to the Control Panel, Personalization, and your Power button, among other features.
  • The Windows key + O locks orientation on devices with an accelerometer.

How to Unlock Huawei E355s-1 Modems


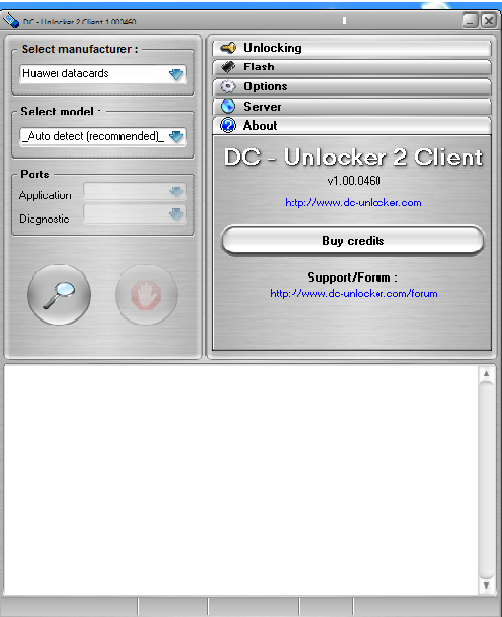
  Extract the files to your desktop, click on DC crap then run the file. Disconnect to the internet and plug your USB modem with a different provider SIM.(for Huawei users, you don't need to swap any SIM). And insert your modem to the USB port.


Datacards,now choose that matches on your modem)
Choose what manufacturer that your modem is. (Huawei Datacards or ZTE.
 Click the magnifying glass, and it will search for plugged USB modems.


Once the modem is detected, go to unlock by your right upper side and Click the Unlocking menu, then choose "unlock".


Wait till the unlocker program says that, unlock is successfully done. Nowyour modem can accept other network

HOW DC-UNLOCKER LOOK LIKE


Monday, June 29, 2015

HOW TO SPEED UP A SLOW PC 2

Having a slow computer is not something most users fancy, but that is what most of us end up with after prolonged usage despite having the latest hardware. Understandably, there are also a few of us who are trapped with a low-end PC and are forced to get as much out of it as possible. This article caters to both these type of users as it not only explains how to make your computer as fast as it was when new but also how to reduce the footprint of your system to utilize your PC's current system resources in the best possible way.

First thing first. Make sure your PC isn't infected by a virus, worm or other malware

Anyone who has used an infected computer will verify how painfully slow a computer becomes when infected by a virus. More tech savvy users will counter that an infected computer's speed depends upon the type of malware. To be honest, it does. However, based on my personal experience, I can say that while some malware are designed specifically for making computers slow and unresponsive, most malwares tend to decrease a computer's performance. 

If your computer is infected, the first thing you need to do is deep scan your entire hard drive to remove all traces of the virus. Also, scan your secondary storage devices to make sure that they are clean as well. Additionally, make sure to follow best security practices to avoid getting infected in the future.


Remove unused and unnecessary programs

Now that we are sure that your computer is not slow because of a virus, you need to get rid of all the unnecessary programs that you have installed on your PC. To remove these programs, go to Programs in the Control Paneland uninstall your unnecessary programs one by one. If you are like most Windows users (including me) and are having a tough time figuring out which programs to uninstall as all of them seem important, follow this rule: If you have not used the program in the last month, it probably is unnecessary. It is better to uninstall that program given that you can reinstall it whenever required. It also is a good idea to remove all the useless software that came bundled with your computer. If you want, you can remove unused Windows features as well to further tone down your operating system.


Remove unnecessary startup programs

Startup programs are the programs which start automatically each time a user logs on. Not only do they result in a slow startup, but they also run persistently, until you close them manually, continuously consuming valuable system resources (CPU and RAM) while they are running. So, disabling unnecessary startup items results in both a faster startup and a more responsive computer, as these applications not running continuously means more RAM and CPU will be available for the operations you perform on the computer.

To disable unnecessary startup programs, type msconfig in the search bar in Start menu (in Windows 7 and Windows Vista) and on the Start screen in Windows 8 and 8.1. On Windows XP, type this in the Run dialog box. This will start the System Configuration utility. Click on the Startup tab and disable all the applications that you think are not essential on your computer's startup. Restart your computer to see the changes. Keep in mind to not disable your security products as that will make your computer more susceptible to getting infected.

Restart your computer often

PC speed
This is assuming that you continuously use your computer for long periods of time. Each time when you close a running program in Windows. it frees the memory that the program was occupying. However, it may so happen that some parts of the memory do not get freed which results in less system resources available to you to use which ultimately results in a slower PC. When you restart your computer, these occupied spaces in the memory get freed. Although, this memory issue has been somewhat fixed in recent versions of Windows, it still is a good idea to reboot your computer at least once a day.

Check your hard drive for errors

Over time, as you use your computer, chances are that some errors might creep in your hard disk which negatively affect your computer's performance. The best way to solve this issue is by using the inbuilt Disk Check utility available in all versions of Windows. To use it, execute chkdsk /r in the Command Prompt. Remember to open the Command Prompt as an administrator. It might prompt you to restart your computer. Execute Y to restart your PC. The chkdsk/ r command scans your computer's hard drive for errors and recovers readable data. Depending upon the size of your hard disk, this step might take some time. This step might increase your computer's performance phenomenally if there are a lot of errors on your hard drive.

Make sure you have enough free space

System speed is not only dependant upon CPU and RAM. If your hard drive is above 95% full, you will notice that your system hasn't been running at the fastest speed. This happens because Windows require empty space for swap files to increase in size and also as space for temporary files. It is imperative that the more cluttered and filled a hard drive is, the more difficult it is to read. To solve this issue, delete unnecessary data or move it to external storage devices.

Repair protected Windows system files

As you use your computer, it is possible that one or more system files get damaged or get corrupted which might effect your system's performance in a negative way. Thus, it is important to check that all your system files are original and behaving as they should. The best way to check your operating system's files is through the System File Checker. To run the System File Checker, open Command Prompt as an Administrator and execute sfc /scannow. This command will check all your system files and if it finds that some of them are modified or corrupt, it will replace them with the original. This step can take anywhere between 5 to 15 minutes but is one that you should perform especially if your system has ever been infected by a virus.

Disable unnecessary visual effects

Speed up slow computer
The visual effects that make your computer look beautiful also slow it down considerably. So, if you want to get the best performance out of your computer, you should disable all these visual effects. To disable these visual effects:-
1) Press Windows Key+R to launch the Run dialog box.
2) Execute sysdm.cpl.
3) Go to the Advanced tab in the following Window and click on Settingsin the Performance section.
4) Then encircle Adjust for best performance. If you want to use visual styles and themes, check it (located at the very end of the list).
5) Click on Apply to apply the changes.

Disabling these visual effects could lead to a considerable improvement in your system's performance especially if you are on Windows 7 or Windows Vista and using the Aero interface without a graphic card.

Do not run multiple antivirus programs

Make sure that no more than one antivirus program is running on your PC. An antivirus's resident protection takes a lot of resources. So, having more than one antivirus program would bring about a significant reduction in your computer's speed.

Disable sound schemes

Whenever you perform an action in Windows, a sound is played to indicate it. Although it leads to a better user experience, it also contributes towards slowing your PC down. To make your PC a lean work machine, you should disable these sounds. To disable these, open Sounds from the Control Panel or alternately type mmsys.cpl in the Run dialog box. Go to the Sound tab and select "No Sounds" from the Sounds scheme dropdown list and click Apply.

Update Windows and make sure that you are using the latest drivers for your hardware

Having all the updates ensures that your computer is running the best possible version of your operating system and your hardware is being utilized by the best possible code. Also, an updated operating system makes you more secure against future intrusions by performance reducing malware.

Make computer fast

Use a Registry Cleaner to keep your Registry in good shape

The Windows Registry is a place which keeps information about all installed programs and active system files on your system. Over time, as you install and uninstall programs, the Registry can get filled with useless entries which might increase its size making it difficult to read. This happens because most uninstallers don't remove the program's Registry entries during an uninstall. Also, the larger the Registry is on your computer, the more time Windows will take to start.

To solve this issue, use any free Registry cleaner to remove useless entries. Depending upon the number of entries in your Registry and its size, you might see a significant increase in your computer's performance.

Delete Temporary Files

Temporary files are stored in your computer as Windows operates. They are files that contain your recently accessed files list, log files, your internet history, form history, cookies and temporary internet files. Over time, the number of these files increases and cleaning them becomes important. You can use CCleaner (mentioned above) to clean them or the inbuilt Windows Disk Cleanup utility by executing cleanmgr.exe in the Rundialog box. You can also schedule a disk cleanup to ensure that it happens automatically.

Disable Windows Search Indexing Service

Fast computer
The Windows search indexing service scans all the files and folders on your system and stores information about them in a database to make searches faster. Naturally, this results in consumption of resources. If you don't use Windows Search often or are willing to trade faster searches for a faster computer (as you should), disable the indexing service. To disable it, executeservices.msc in the Run dialog box. In the work area on the right side, locate Windows Search service and double click on it. In the followingProperties dialog box, select Disabled from the Startup type dropdown and click OK. Restart your computer. Your searches will be slow but your computer will be faster than ever.

Check Device Manager to look for hardware conflicts

Open Device Manager to see that all the connected hardware are functioning properly. If you find a hardware conflict, take the necessary steps to resolve it. If the conflict cannot be resolved, disconnect the problematic hardware until you find a solution.

Change to High Performance power scheme

If you are running your computer on a battery and notice that it is running slow, change the power scheme to high performance to increase system speed. Keep in mind that it will increase the amount of power consumed by your computer. To change the power scheme, open Power Options from the Control Panel. You can directly search for Power Options in Windows 7, Windows 8 and Windows 8.1 from the Start Screen/Menu.

Check if your computer is overheating

If your computer is overheating, then it is possible that it is causing your computer to run slowly. This is because most modern processors slow down when the computer is overheated to allow the computer to cool down. 

To prevent your computer from overheating, make sure that the cooling fan works properly and that there is no dust clogging the air vents as it will prevent air flow which will result in poor cooling. Clean your computer's case with a light brush and place it somewhere where it can be effectively cooled by air. If you use a laptop, a cooling pad might be of help.

Defragment your hard drive

When Windows stores a file on your hard drive, it does not look for a single place to store your file as a whole. Instead, it stores the fragments of the file randomly, i.e storing them at whatever empty space it can find the quickest. Due to this, the fragments of a single file can be scattered all across a hard disk. A hard drive that has many files distributed like this is called as fragmented. Naturally, this results in slower file access times because Windows needs to find all these pieces and put them together (something like a jigsaw puzzle) before the file can be accessed.
Defragment harddrive to increase PC speed

This is what defragmentation corrects. When you defragment a hard drive, the scattered pieces of a file are put together and stored on the hard disk in continuous cells (assuming a hard disk to be made up of a large number of cells with each cell representing a particular storage space).

To defragment your hard drive, you can use the in-built Windows Disk Defragmenter utility. It can be searched on the Start Screen in Windows 8 & 8.1 and is located at Start>Programs>Accessories>System Tools in older versions of Windows.

Use ReadyBoost to increase the speed of your Windows computer

If you are running a computer that does not have enough RAM, using a flash drive with the ReadyBoost technique can and will give you significant improvement in speed. As with ReadyBoost, your flash drive becomes a cache that stores files that you might immediately require giving you faster access times than if those files had been stored on a hard disk. 

Keep in mind that ReadyBoost depends upon the condition of your flash drive and was intended to increase speeds of devices which were short on RAM. If you already have a sufficient amount of RAM, chances are that you might see very little to no improvement in speed by using it. 

Reinstall Windows

This is one of the more drastic methods and should only be used if all the methods mentioned above fail to bring any significant increase in your computer's speed.
Speed up Computer

If you haven't reinstalled Windows in a really long time, it is possible that because of constant use, the system has got bogged down with useless clutter in a way that no amount of tweaking will fix its condition. Then, reinstalling Windows is the only option.

Reinstalling Windows brings about a definite increase in speed but gives you a new PC without all your software and customization. Modifying it according to your needs will take a lot of time though but that is something you must sacrifice for a faster PC.

If you use Windows 8 or Windows 8.1, you can refresh your PC without affecting your installed apps and settings. To refresh your Windows 8 PC, open Update and Recovery by going to Change PC Settings from the Settings button that appears when you move your mouse pointer to the right side of your screen. Under it, click Recovery. Then under Refresh your PC without affecting files, click Get Started.

Upgrade to a solid state HDD

Although solid state hard drives are a lot faster for writing and reading data than older optical hard drives, their heavy price is something that keeps them out of the range of many. Still, if you do manage to get one for your PC, the change in speed will be immediately visible.

If all else fails, get more RAM

RAM or the Random Access Memory contains all files of the currently running programs that are immediately required by the computer. Accessing files from the RAM is much faster than doing the same from a hard disk. This means that more the RAM you have, more the programs you can run without compromising on speed. RAM upgrades do not cost much and are one of the best ways to speed up a slow computer.